How to Create a WordPress Website in 5 Easy Stages with Bluehost
How to Create a WordPress Website in 5 Easy Stages with Bluehost;
As we read the title of this post, we may be thinking to ourselves, this sounds very daunting and rather intimidating. Nope, ( couldn’t be further from the truth ) this is actually much easier than we might think. The way technology has advanced today has really improved the way we work and made online tasks like this much much easier and simpler for us. We will peel back the layers and dig down on this exercise and see what is involved in setting up a website by ourselves. We will look at the steps required to get this process started, look inside bluehost, look at installing WordPress and then connect all the pieces together.
As the title suggests… How to Create a WordPress Website in 5 Easy Stages with Bluehost, this is all the time it takes. I suppose I might say that as I have done this task a number of times and am probably a little ahead of some people as far as performing this exercise. I will say that I have 5 websites with Bluehost, but I will also say this, I attempted setting up my first website on my own, a few years back. I got to 80% of the journey and had to ask for assistance from Bluehost support, then completed the task. So let’s go and build our own website from scratch. There are just 5 simple steps involved as listed below.
- Setting up an account with Bluehost
- Purchasing a Domain name
- Selecting a Bluehost package
- Paying for our Bluehost Package
- Connecting to WordPress
Lets get started;

Head on over to Bluehost by clicking here and we will go ahead and set up an account with Bluehost hosting. As per image to the right, click on the green button GET STARTED and we are on our way. This brings us to the hosting section of Bluehosts hosting plans selection. Now, looking at the image under here, the next selection that we undertake is literally and totally dependent on our budget. It’s worth noting that cheapest is not always the best option. The Basic Plan, which costs just $3.29 per month, looks very attractive, but if we look closer again, we can see that this plan only accommodates just 1 website. If we can manage to go for the Plus or Choice Plus options, we will see that we have much more additional features for later on down the road. For instance we can see that the 2nd and 3rd choices offer unlimited websites on those plans. Realistically, its just a few dollars extra, but well worth the effort. In this case we will select the Plus package @ $4.96/month.
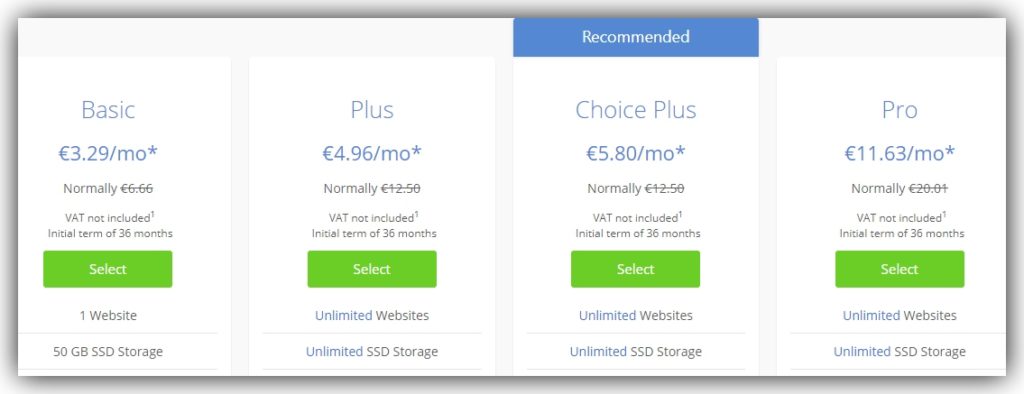
Setting up a Bluehost Account;
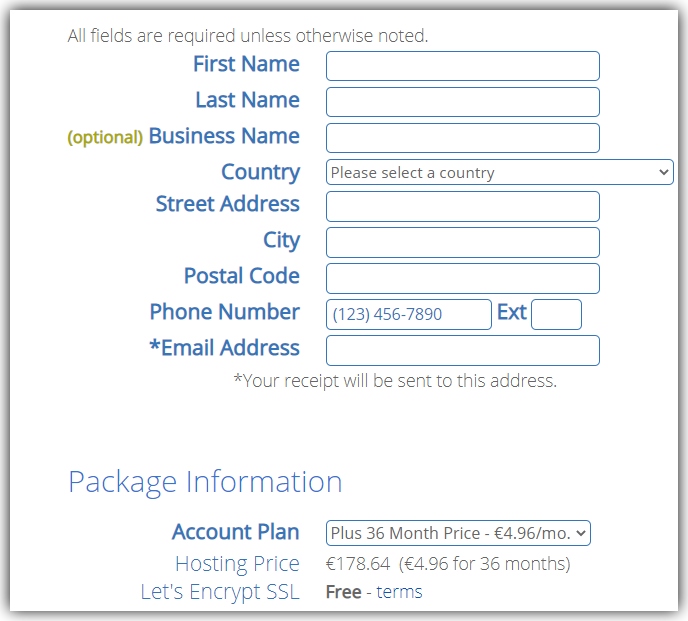
Again, having made our hosting plan selection, click on the green button and that brings us into the back-office account, personal information section. In here we will insert our personal details like, name, address, contact details, email address and so on. Look at the image on the left. This needs to be done only once and as far as our personal security with this information, we need not worry on that front. Bluehost is one of the most popular used sites for hosting websites, especially as they have approx 2M. customers on their books worldwide. So, with that said, they are one of the safest websites on the planet as far as personal information is concerned.
Selecting a Domain Name;
The next step in the process is to select a domain name for our website. Once upon a time in the early days of website design and creation the domain name had to be related to the content of our website. The reason for this is, Google’s algorithms insisted on this for SEO purposes. That is how we were actually found on the internet. Now all that has changed, Google now finds us by keywords mainly and by the content of our website. Still, we need to keep the domain as near or related to the type of our content as far as possible. For instance, if we were setting up a website about ‘dog training’, we would like to have our domain name titled something along the lines of dogsonleads.com or doggyrules.com or as near to the subject content of our website, as we possibly can.
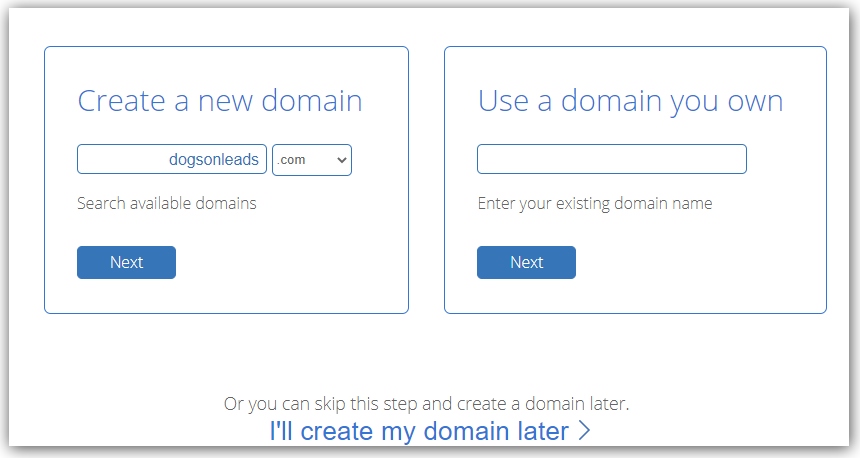
As you can see from the image above, the next step in creating our website is to select a domain name. This task as I explained above is reasonably straightforward and all we need do is insert domain name into the box as outlined in the image.

Payment options;
For this exercise I inserted the name dogsonleads, as we discussed above. ( without checking, I discovered that dogsonleads.com was not available so I tried dogsonleads1.com and that was available ). Go ahead and click on Next and we are into the domain name registry. You are then brought to the payment details, where we will pay for our package and hosting plans for a 36 month term. If we go back up to the Bluehost Hosting Plans, we will see that the plans come with a 36 month term subscription. We will also see that we have free SSL attached to our website domain, which means that our website has a security certificate attached and that guarantees us, that our website is safe and secure from hacking.
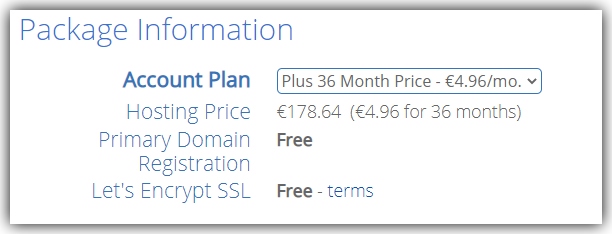
Why did I not pay for my Domain;
Well believe it or not as I was going through the steps in creating and paying for a Bluehost hosting package, LIVE , for the purpose of this post, a drop down window appeared. See image below. They offered me a free domain name for 1 year, with my package. So, as you can see, Bluehost are not all about….take take take. They have these freebies now and again, which all helps along the way. Normally a domain name costs about $10-$12 per annum. That is why a charge for my domain did not appear on my checkout page. If that happens, just click on the green button and the freebie will be applied to your account, in due course.

Connecting to WordPress;
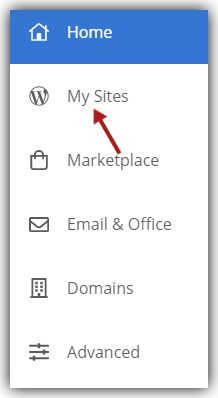
We are almost there, 95% to be approx, if we are wondering as to how much work is left to getting our website up and running. As soon as we have paid for our Bluehost package, we are then automatically redirected to our Bluehost back office. On the left hand site, we will see a menu ( as per image ). Click on My Sites and you are brought onto the next step in the process. Here you name your website, please note this is not your domain name. Basically it’s a title that you give your website also also create a tagline for your site. This information can be changed later on if you do not like the title that you have chosen. See image below again and you will see that I have stayed with the ‘dog training’ theme or topic, for the purpose of this post. All we do is to follow the steps as instructed, ie, click next and we are then complete with setting up our website.

As you can see above, I have inserted website title details of a dog training site, this info. can be changed-out at a later stage, if we are not happy with what we have inserted here. We can check out all the options once we have the website created which incidentally is at the NEXT click on the above image. After this step, we are brought to our WordPress dashboard and that is where the fun and excitement begins. Just like this post that you have read, you can go ahead and create stunning, informational posts or blogs on any topic or subject, that you wish. Both Bluehost and WordPress has enabled even the most uninformed of us, become creative and informative in the area of website creation and blogging.
To summarize:

I hope this post on How to Create a WordPress Website in 5 Easy Stages with Bluehost has enlightened your perception of what is involved in creating a website. It’s really not that daunting as once we thought it was. Like I said, both Bluehost and WordPress have simplified this process by partnering together for our benefit.
If you have enjoyed this post on How to Create a WordPress Website in 5 Easy Stages with Bluehost, please leave any comments or observations in the comments box down here under. We will endevour to reach back to you and address any issues or concerns, as soon as we possibly can. To get started with Bluehost, click on the link below, follow the steps as outlined on this post and you will be up and running in no time.
